Tools
- Getting Started On Your New Windows
- Selecting The Right Window
- Types Of Windows
- Window Options
- New Construction Window Measuring Guide
- Replacement Window Measuring Guide
- Windows Checklist
- New Construction Window Installation Guidelines
- Upgrade Your Home’s Energy Efficiency
- Andersen Windows Warranty Service
- Andersen Windows & Doors Virtual Showroom Tour
- Care, Maintenance and Troubleshooting of Andersen Windows and Patio Doors
Measuring for new windows is easy. To determine the size of the window you will need, follow these simple steps:
Determine whether or not you are simply replacing the operating portion or the entire window unit including the frame. If you are only replacing the operating part and leaving the frame and trim intact, follow our replacement window measuring guidelines. If replacing the full window unit including the jambs, refer to the full-frame measuring guidelines below.
Some common measuring techniques are illustrated in the figure below and may not apply to all manufacturers. Be sure to refer to the manufacturer’s instructions to ensure properly sized windows.
If you are unsure or uncomfortable, stop into your local Curtis Lumber and let our friendly and knowledgeable salespeople walk you through the process.
Measuring for a Full Frame Window:
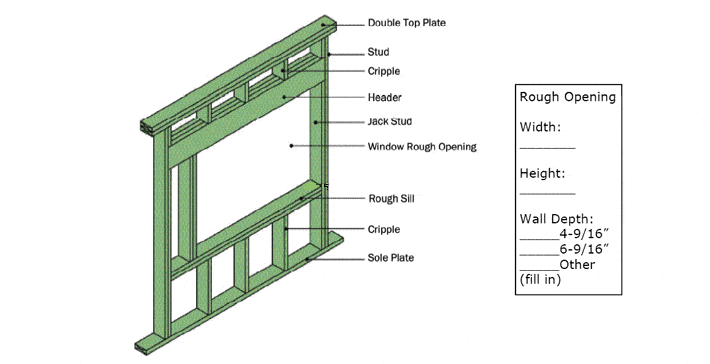
When measuring for a full-frame window unit, you are trying to determine the rough opening. The rough opening is the unfinished wall or ceiling opening where a window or door will be installed. It is surrounded by studs on either side, a header to the top, and a rough sill to the bottom. It is the framing to which the window will mount.
- Remove the inside trim to bring jack studs, header, and rough sill into view.
- Measure the width of the opening from jack stud to jack stud and record the measurement.
- Measure the height from the bottom of the header to the top of the rough sill and record the measurement.
- Measure the depth of the opening and determine if the wall is 4-9/16″ or 6-9/16″ thick and check off the appropriate box.
- Repeat for each window and bring the rough opening measurements to your nearest Curtis Lumber or fill out our window quote request form. Our salespeople will then be able to show you the options that are available.